Friday, May 17, 2019

Fix Stuck VMware Tools Install

When automatic VMware tools upgrades is enabled in vCenter, sometimes the ISO will unmount before the installer notifies vCenter that the installation is done.  This will cause vCenter, and the host the VM is registered on, to think that VMware tools installation is still in progress even though it is complete.  The VM will be left in a state where it can't migrate, which means the host is unable to enter maintenance mode.  To fix this, we need to manually kill the process within ESXi that is running the stuck tools installation.

Start by enabling SSH on the affected host, then use Putty (or the SSH client of your choice) and login to the host.  Run the commands below to get the process ID for the affected VM and then to kill the installation process.

Within your SSH session, run the command:

vim-cmd vmscv/getallvms

Find the VMID of the VM with the stuck tools installation and run the command:

vim-cmd vmsvc/tools.cancelinstall id_number

Replace "id_number" with the correct VMID found with the first command.  This will kill the VMware tools installation process allowing the VM to be moved with vMotion and the host to enter maintenance mode.
Friday, April 26, 2019

Create a GPO for RegFix Required by MS15-124

Registry modification is required to fully mitigate against the IE ASLR Bypass vulnerability  (CVE-2015-6161) addressed in MS15-124 and patched in KB3116180 and newer IE cumulative updates.  Without the registry entries, systems are still vulnerable.  This will also cause the update to be listed as missing, or incomplete, in security scanners such as Tenable Nessus.

In large environments, Microsoft recommends deploying the registry fixes via GPO rather than via their downloadable fix-it program.  My experience has been that newer IE updates will sometimes remove the registry entries that need to be created, so having them in a GPO will ensure they persist through future patch cycles.

To create the GPO:
  1. Open Group Policy Management
  2. Create a new GPO and open it in the editor
  3. Click Computer Configuration -> Preferences -> Windows Settings -> Registry -> Right-Click, Click on New Registry Item and create the following two entries.
    • Reg Item 1:
      • Action: Update
      • Hive: HKLM
      • Key Path: SOFTWARE\Microsoft\Internet Explorer\MAIN\FeatureControl\FEATURE_ALLOW_USER32_EXCEPTION_HANDLER_HARDENING
      • Value Name: iexplore.exe
      • Value Type: REG_DWORD
      • Value Data: 1
    • Reg Item 2:
      • Action: Update
      • Hive: HKLM
      • Key Path: SOFTWARE\Wow6432Node\Microsoft\Internet Explorer\MAIN\FeatureControl\FEATURE_ALLOW_USER32_EXCEPTION_HANDLER_HARDENING
      • Value Name: iexplore.exe
      • Value Type: REG_DWORD
      • Value Data: 1
  4. Once the GPO is created, link it to any OUs containing computer objects.

Thursday, December 3, 2015

Convert Windows Server 2008 R2 from Standard to Enterprise

I've had a few cases recently where SQL VMs that have been around for a while (years) have reached the point of needing more than the 32GB of RAM that Windows Server 2008 R2 Standard allows you to use.  Thankfully, there's a nice and simple method for converting your Standard edition server to Enterprise edition using DISM and the generic KMS key with minimal down time that's been documented here on a TechNet blog.  The KMS key is only used for the conversion command, you will still need to re-enter your organizations license key in order to re-activate the OS once the conversion process completes.
  1. Open up and elevated PowerShell prompt.
  2. Type: DISM /online /Set-Edition:ServerEnterprise /ProductKey:489J6-VHDMP-X63PK-3K798-CPX3Y
  3. Wait for the process to complete, and agree to reboot the server.
  4. After the reboot completes, login to the server and you'll be asked to complete the activation process.
  5. Reboot one more time.  Probably not required, but it makes me feel better.
I've now completed the procedure on several servers with almost no issues.  The one time I did have an issue, the activation of my organizations normal MAK key looks like it didn't process completely, despite the OS reporting a successful activation.  The symptoms of the issue were RDP not working, RDP options not even being present in the Remote Settings tab of the System Properties window, and the OS reporting the full amount of RAM visible, but only 4.0GB usable.  The amount of usable RAM being limited to 4.0GB was easily confirmed using Task Manager.  After doing my best not to freak out, and scrambling to find a solution that didn't involve restoring from the previous backup, I was able to locate the solution here, documented by a Spiceworks user.

  • Open up and elevated command prompt and ensure you're in the "system32" directory.
  • Clear any KMS key entries by typing: slmgr.vbs -ckms
  • Clear any product key entries by typing: slmgr.vbs -upk
  • Input your organizations product key by typing: slmgr.vbs -ipk xxxxx-xxxxx-xxxxx-xxxxx-xxxxx
  • Invoke the activation process by typing: slmgr.vbs -ato
  • After activation completes, you'll be asked to reboot.

  • I'm still not certain why this one instance of converting the OS to Enterprise edition (or the subsequent re-activation process) caused this to happen.  However it only happened once out of the several of these that I have completed.  Thankfully, I found the easy fix. Needless to say, it's always best to make sure you have good backup to restore from.  Just in case.

    Wednesday, October 28, 2015

    Horizon View Client DPI Scaling

    I recently got new monitors for my desk that are 4k (3840x2160) resolution.  While I can set my Windows 10 desktop to scale the text to 150% to make things readable, the Horizon View client did not scale when I connected to my VDI desktop.  This made the icons/text on the remote desktop completely unreadable.  Opening the compatibility settings for the Horizon View Client .exe file and unchecking the "Disable display scaling on high DPI settings" box didn't resolve the problem either.  After searching around for an solution, I finally came across the answer here.

    If you're using the Horizon View client version 3.4 or newer, you can add a registry setting to have the client follow your desktop's display scaling settings.  
    1. Open up regedit
    2. Navigate to: HKCU\software\vmware, inc.\vmware vdm\client
    3. Add a new DWORD value named "EnableSessionDPIScaling"
    4. Set the value to "1"
    After doing this, reopen the Horizon View client, connect to your session, and it should be scaled to the same ratio as your native desktop.

    Friday, August 14, 2015

    Enable SSH on Multiple ESXi Hosts With PowerCLI

    Enabling SSH on a large cluster of ESXi hosts through both the desktop vSphere client and the vSphere web client can be a real pain and a huge time suck.  Using VMware's PowerCLI, it's really easy to enable SSH on all hosts connected to a vCenter server with one command.

    Open PowerCLI, connect to your vCenter server and run the command:

    Get-VMHost | Foreach { Start-VMHostService -HostService ($_ | Get-VMHostService | Where { $_.Key -eq “TSM-SSH”} ) }

    To turn it off again:

    Get-VMHost | Foreach { Stop-VMHostService -HostService ($_ | Get-VMHostService | Where { $_.Key -eq “TSM-SSH”} ) }

    Testing Jumbo Frames in Windows

    To improve backup performance from my Veeam server to a dedicated storage appliance, I implemented jumbo frames on a NIC dedicated to backup traffic, and on the appliance.

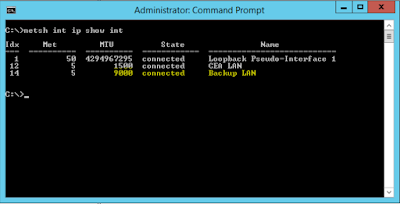
    First, use netsh to confirm the NIC is configured for jumbo frames.


     The "Backup LAN" interface shows the correctly configured MTU value of 9000.  I added the highlighting.

    To test whether or not jumbo frames are working from the server to the destination use a ping command along with the -f and -l parameters.  -f tells the ping to not fragment the packets, and -l specifies the size of the ping packet.  The max size for this is actually 8972, rather than 9000, since the first 28 bytes of the packet aren't encapsulated.


    A reply means that the server, destination, and everything in between are all correctly configured for jumbo frames.

    Monday, July 20, 2015

    Fixing Horizon View Linked Clones in WSUS

    I recently noticed that only one desktop from each of my VDI pools was showing up in my WSUS client.  The name and IP of the single desktop in each pool would change throughout the day, so I knew all of them were reporting in at different times.  However there was only ever one VM from each pool represented in WSUS at any given time.  After some searching, I learned that each computer that talks to WSUS gets a unique client ID.  Since the base VM I used for each of my desktop pools was joined to my domain and talking to the WSUS server prior to it being cloned out, the unique ID of the base machine was also the unique ID of every VM in each pool.  WSUS lists client machines based on their unique ID, hence only one VM from each pool being visible in the WSUS console.

    The solution for me was to stop the Windows Update service on each VDI VM, wipe out the unique ID in the VM's registry, then reboot the VM.  The PowerShell commands I ran on each VM are below.

    net stop wuauserv
    REG DELETE "HKLM\SOFTWARE\Microsoft\Windows\CurrentVersion\WindowsUpdate" /v SusClientId /f
    REG DELETE "HKLM\SOFTWARE\Microsoft\Windows\CurrentVersion\WindowsUpdate" /v SusClientIdValidation /f
    net start wuauserv
    wuauclt /resetauthorization /detectnow
    wuauclt /reportnow

    The articles I'd read indicated that after running those commands, a reboot wasn't required.  However the VDI VMs I ran these commands on did not show up in the WSUS console until after a reboot.

    Update 08/04/2015:
    I've confirmed that you can prevent this from happening in linked-clone desktops by removing the two registry keys from the base VM prior to shutting it down and snapshotting it for use with View Composer.  Once the linked-clone VMs are up and running, they'll contact WSUS and each will get their own unique ID.  This will ensure they all show up individually in the WSUS console.